
Recently a dealer asked how they could track which customers have opted to receive Text notifications. One way is to add a Custom Field to your Customers list with a Yes/No type of response.
Click on the Customers icon to open your customer list.
![]()
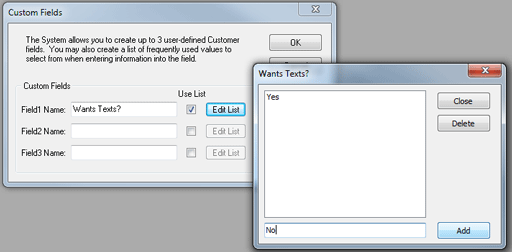
From the menu, go to Options -> Custom Fields. A popup window will appear.
In the Field1 Name type Wants Texts?:
1. Check the box to Use List
2. In the popup window, type Yes
3. Click Add
4. Now type No
5. Click Add
Click Close to close the dialog window. Close the Customers list, and reopen your Customers list.
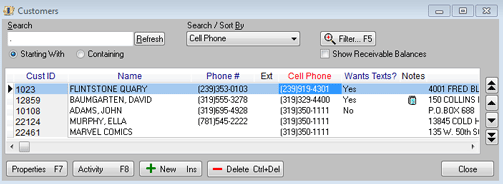
Next, scroll to the far right end of the available columns. You will find a column labeled ‘Wants Texts?’
To populate this column, click the Properties button or use F7 to edit a Customer record. Custom fields appear on the 2nd tab (Additional).
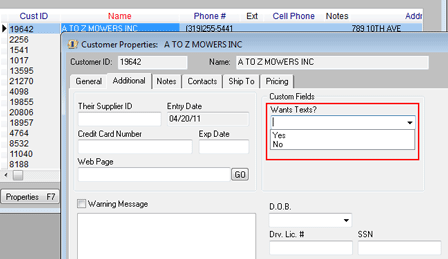
Inform your employees to always set this response, when a customer provides their cell phone number and the box is checked to Allow Texts (which appears on the first tab).
TIP: Consider incorporating a rule that a blank response would indicate the customer has not been asked. A response of No indicates they were asked and declined.
Now that you have data, remember that you can arrange the Customers list to show the Cell Phone and Wants Texts columns by dragging the headings (click on the column heading and hold down the mouse button while you move to a new column location) until they display near the Name column. You can also resize the columns.
To save the position and width, use the menu to go to File -> User Settings.
Check the box for Remember Grid Column Widths. Suppliers and Products screens also have the Custom Fields feature.
If you do not choose to check the box to Use List, then the fields can store any type of comment, phrase, or value. The option for Use List is handy if you want to limit the acceptable values.
Once custom fields are defined, many reports can be set up to use them.